 |
| And Sew it Goes - 8" x 10" |
I have been recaltrent in my blogging efforts lately. Spring has definitely sprung and with it all the busy busy things we do when we are feeling squirrelly with the squirrels!
However, in the last month I have definitely gotten back in touch with the sewing machine. My 368 project has taken a backseat to the forever commissioned quilt, a quilt show and many commitments in helping there, and some challenges. This is one I did for
Quilting Arts and had some requests for a pattern. This little project is quick, striking, and suitable for ANY sewer's space!
This is my design, but the steps are below. In the challenge we are asked to represent the seasons of life and change in 8 X 10 inches. Thats a big order! I had to think about that and wondered about showing something that has traveled thru life with me but changed with the times. AHA! Sewing machines!
 |
| Sketch of design. I thought at one point I would paper piece HSTs - but no! |
I went online and found some sewing machine silhouettes that losely resemble machines I have used in my life. I then traced them on the interfacing backwards. Since the interfacing would be ironed onto the back of the fabric, and sewing machines face to the left, I needed my tracings to face right as they would be reversed during the process. After tracing them on a light iron on interfacing backwards I then started on the base of the quilt.
 |
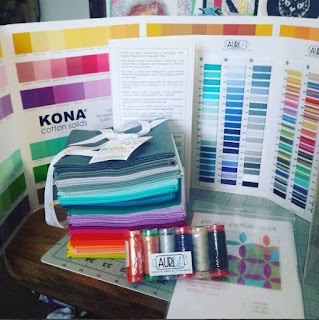
| Seasonal colors and black and white to offset. |
Since this is such a small quilt I decided I did not want a lot of prints to destract from the design. Pulling out my solids and solid-read fabrics I went for colors that would also evoke the seasons - spring, summer, fall and winter. A big contrast in colors and then outlined with black and white, and we have a base and a fabric plan!
 |
| Base done with applique fabrics for each season. |
Next step, take the applique fabrics I have chosen, iron the traced interfacing to the back, and cut out with my small sharp embroidery scissors.
 |
| Interfacing ready for the iron. |
 |
| Applique sewing machines cut out and ready for sewing. |
Once I had the sewing machines cut out I was SO excited! They are so adorable! Then I had to decide how I would attach them. As there are some very small pieces, some only a thread or 3 wide, I knew I did not want to poke a needle thru those pieces and possibly shred them. Instead I layered white tulle over the top and free motion quilted around the silhouettes.
Then I used various free motion designs inspired from
Leah Day's design library for each section. Once those were done I carefully cut the tulle away from the black and white border.
For the binding I wanted to continue the black and white, but felt I needed something with a bit of pizazz. Out comes the black and white striped fabric I have! I have never bound with stripes before. It adds a very unique and whimsical touch!
 |
| Close up of And Sew it Goes |
And voila! I am very pleased with how this came out. It can be modified with sewing machines YOU have used as well. Please feel free to comment with your thoughts and questions, and keep sewing!

Hello Vagabondindigo,
ReplyDeleteWhat a fun quilt! So colourful, and lovely quilting!
Just thought I'd let you know about the link up I have started on my blog... Would love to see you there!
http://lizzielenard-vintagesewing.blogspot.co.uk/2014/06/where-has-free-motion-friday-gone.html
Love, Muv